HAPPY HALLOWEEN!
Sugar Skull Tutorial
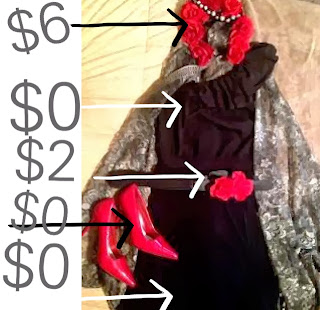
I got SO many compliments on my costume this year! I was really impressed with the outcome as this was one of the cheapest costume's I've ever done. It was so inexpensive as I was able to use a lot of items from my closet. Below is a picture of my costume and prices for what I had to spend to get it all to come together. The majority were pieces I already owned so I counted them at zero. Such a steal!
I used a dollar store headband and flowers. Dyed and hot glued the veil (lace I got at a thrift store for $1.00) to the headband then glued the roses on top. The pearl detail is an old necklace that just gave it that perfect little touch.
The top is from Forever XI, skirt from Old Navy. I used a black belt I already had, plucked the roses from their stems and poked the tips through the belt holes. Genius!
Shoes are Delicious which I already owned. I used temporary tattoos on my chest from Dollar Tree and I'm really glad I did. It was the perfect touch for the final product!
Now for the best part... the makeup!
I used 90% of what I already had in my makeup bag. The only things I had to purchase for the costume were the gems (Dollar Tree) and eye black (Fred Meyer). All of this purchased new would probably be about $25-$30 bought at full price. Colors are not specific for this costume. I just looked at some pictures and based what I wanted from that and made the rest my own.
It was so fun!
It was so fun!
1. Wash face. (I left my mascara for more substance.)
I chose not to do a white face as I liked the plain look better and the white face paint is hard to draw details on.
2. Using liner, draw rings around both eyes.
3. With Q-tip, fill in the rings around the eye. Once full, I used my fingers to give the black a more even texture as the Q-tip was less messy but left lines.
4. Draw bubbles around eye black. Colored eye pencil is fun but the black stands out best. I sugget outlining the color in black if you decide to use a colored pencil for the bubbles.
5. Fill the bubbles with any color eye shadow.
I used blue. No reason other than to add some color!
6. Dab a bit of the eyelash glue on the back of your gems and stick in the bubble area. Don't do too much as it will make it more likely to slide around and takes longer to dry.
7. Apply your false eyelashes.
Not necessary but with
such a dark area around the eye, I thought it would help give the actual eye a little more attention.
(Using colored or glitter and/or jeweled lashes could be fun too!)
8. I added black and red glitter on top of my eye black to break it up a little. It sticks right on the makeup so that was an easy step!
9. Using your eye liner, draw lip stitches across the mouth.
Be sure to draw your lips back tight during this step to get your lip lines straight. It can be a little difficult in the corners.
10. My headpiece covered my ear and sideburn area so I didn't draw back that far on my face.
11. I created a spade shape on my nose. This part can be tricky.
Be mindful of what areas you want to paint black as you will probably get an itch or two!
12. Add any finishing details you desire. I liked the look of a big jewel on the forehead and lots of detail on the chin. I did two different drawings on my actual costume and on the tutorial. Do what you want and have fun with it - you really can't go wrong!

Happy Haunting - XO


